
Page 57 - CC2017_AN_Look_Inside
P. 57
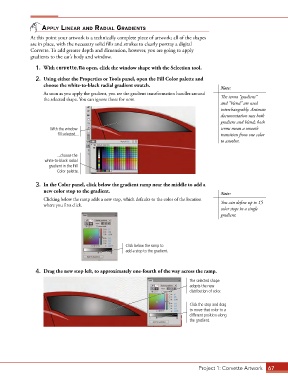
Apply lineAr And rAdiAl grAdients
              At this point your artwork is a technically complete piece of artwork; all of the shapes
              are in place, with the necessary solid fills and strokes to clearly portray a digital
              Corvette. To add greater depth and dimension, however, you are going to apply
              gradients to the car’s body and window.

                1.  With corvette.fla open, click the window shape with the Selection tool.

                2.  Using either the Properties or Tools panel, open the Fill Color palette and
                   choose the white-to-black radial gradient swatch.
                                                                                            Note:
                   As soon as you apply the gradient, you see the gradient transformation handles around   The terms “gradient”
                   the selected shape. You can ignore those for now.
                                                                                            and “blend” are used
                                                                                            interchangeably. Animate
                                                                                            documentation uses both
                                                                                            gradient and blend; both
                      With the window                                                       terms mean a smooth
                         fill selected...                                                   transition from one color
                                                                                            to another.

                         ...choose the
                   white-to-black radial
                     gradient in the Fill
                         Color palette.


                3.  In the Color panel, click below the gradient ramp near the middle to add a
                   new color stop to the gradient.                                          Note:
                   Clicking below the ramp adds a new stop, which defaults to the color of the location   You can define up to 15
                   where you first click.
                                                                                            color stops in a single
                                                                                            gradient.


                                                     Click below the ramp to
                                                     add a stop to the gradient.


                4.  Drag the new stop left, to approximately one-fourth of the way across the ramp.

                                                                               The selected shape
                                                                               adopts the new
                                                                               distribution of color.


                                                                               Click the stop and drag
                                                                               to move that color to a
                                                                               different position along
                                                                               the gradient.


                                                                                   Project 1: Corvette Artwork  67