
Page 56 - CC2017_AN_Look_Inside
P. 56
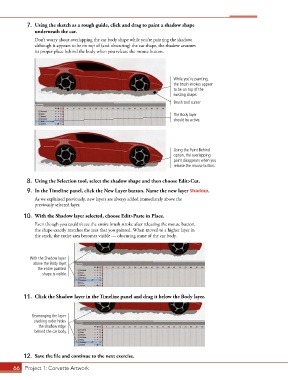
7.  Using the sketch as a rough guide, click and drag to paint a shadow shape
               underneath the car.

               Don’t worry about overlapping the car body shape while you’re painting the shadow;
               although it appears to be on top of (and obscuring) the car shape, the shadow assumes
               its proper place behind the body when you release the mouse button.


                                                                         While you’re painting,
                                                                         the brush strokes appear
                                                                         to be on top of the
                                                                         existing shape.
                                                                         Brush tool cursor

                                                                         The Body layer
                                                                         should be active.


                                                                         Using the Paint Behind
                                                                         option, the overlapping
                                                                         paint disappears when you
                                                                         release the mouse button.


            8.  Using the Selection tool, select the shadow shape and then choose Edit>Cut.
            9.  In the Timeline panel, click the New Layer button. Name the new layer Shadow.
               As we explained previously, new layers are always added immediately above the
               previously selected layer.

           10.  With the Shadow layer selected, choose Edit>Paste in Place.
               Even though you couldn’t see the entire brush stroke after releasing the mouse button,
               the shape exactly matches the area that you painted. When moved to a higher layer in
               the stack, the entire area becomes visible — obscuring some of the car body.


             With the Shadow layer
               above the Body layer,
                 the entire painted
                  shape is visible.


           11.  Click the Shadow layer in the Timeline panel and drag it below the Body layer.


              Rearranging the layer
               stacking order hides
                 the shadow edge
               behind the car body.


           12.  Save the file and continue to the next exercise.

       66 Project 1: Corvette Artwork