
Page 62 - CC2017_AN_Look_Inside
P. 62
orgAnize finished ArtWork lAyers
An Animate project can contain dozens of layers representing the various components
of the animation or movie. To organize all of these layers into logical groups or
categories, you can use layer folders.
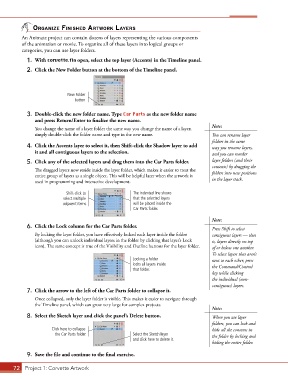
1. With corvette.fla open, select the top layer (Accents) in the Timeline panel.
2. Click the New Folder button at the bottom of the Timeline panel.
New Folder
button
3. Double-click the new folder name. Type Car Parts as the new folder name
and press Return/Enter to finalize the new name.
Note:
You change the name of a layer folder the same way you change the name of a layer;
simply double-click the folder name and type in the new name. You can rename layer
folders in the same
4. Click the Accents layer to select it, then Shift-click the Shadow layer to add way you rename layers,
it and all contiguous layers to the selection. and you can reorder
5. Click any of the selected layers and drag them into the Car Parts folder. layer folders (and their
contents) by dragging the
The dragged layers now reside inside the layer folder, which makes it easier to treat the folders into new positions
entire group of layers as a single object. This will be helpful later when the artwork is
used in programming and interactive development. in the layer stack.
Shift-click to The indented line shows
select multiple that the selected layers
adjacent items. will be placed inside the
Car Parts folder.
Note:
6. Click the Lock column for the Car Parts folder. Press Shift to select
By locking the layer folder, you have effectively locked each layer inside the folder contiguous layers — that
(although you can unlock individual layers in the folder by clicking that layer’s Lock is, layers directly on top
icon). The same concept is true of the Visibility and Outline buttons for the layer folder. of or below one another.
To select layers that aren’t
Locking a folder next to each other, press
locks all layers inside the Command/Control
that folder.
key while clicking
the individual (non-
contiguous) layers.
7. Click the arrow to the left of the Car Parts folder to collapse it.
Once collapsed, only the layer folder is visible. This makes it easier to navigate through
the Timeline panel, which can grow very large for complex projects.
Note:
8. Select the Sketch layer and click the panel’s Delete button. When you use layer
folders, you can lock and
Click here to collapse hide all the contents in
the Car Parts folder. Select the Sketch layer the folder by locking and
and click here to delete it.
hiding the entire folder.
9. Save the file and continue to the final exercise.
72 Project 1: Corvette Artwork