
Page 58 - CC2017_AN_Look_Inside
P. 58
5. Click the car body shape with the Selection tool.
6. In the Color panel, click the Fill Color icon to activate that attribute.
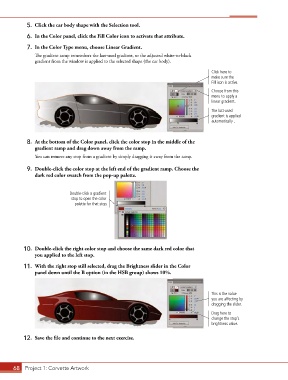
7. In the Color Type menu, choose Linear Gradient.
The gradient ramp remembers the last-used gradient, so the adjusted white-to-black
gradient from the window is applied to the selected shape (the car body).
Click here to
make sure the
Fill icon is active.
Choose from this
menu to apply a
linear gradient.
The last-used
gradient is applied
automatically .
8. At the bottom of the Color panel, click the color stop in the middle of the
gradient ramp and drag down away from the ramp.
You can remove any stop from a gradient by simply dragging it away from the ramp.
9. Double-click the color stop at the left end of the gradient ramp. Choose the
dark red color swatch from the pop-up palette.
Double-click a gradient
stop to open the color
palette for that stop.
10. Double-click the right color stop and choose the same dark red color that
you applied to the left stop.
11. With the right stop still selected, drag the Brightness slider in the Color
panel down until the B option (in the HSB group) shows 10%.
This is the value
you are affecting by
dragging the slider.
Drag here to
change the stop’s
brightness value.
12. Save the file and continue to the next exercise.
68 Project 1: Corvette Artwork