
Page 43 - CC2017_AN_Look_Inside
P. 43
8. Immediately choose Edit>Paste in Place.
Because you moved the transformation point before copying and pasting the object, the
pasted copy also has the same relocated transformation point.
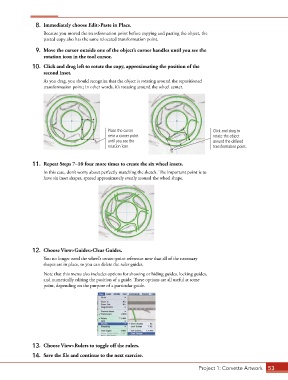
9. Move the cursor outside one of the object’s corner handles until you see the
rotation icon in the tool cursor.
10. Click and drag left to rotate the copy, approximating the position of the
second inset.
As you drag, you should recognize that the object is rotating around the repositioned
transformation point; in other words, it’s rotating around the wheel center.
Place the cursor Click and drag to
near a corner point rotate the object
until you see the around the defined
rotation icon. transformation point.
11. Repeat Steps 7–10 four more times to create the six wheel insets.
In this case, don’t worry about perfectly matching the sketch. The important point is to
have six inset shapes, spaced approximately evenly around the wheel shape.
12. Choose View>Guides>Clear Guides.
You no longer need the wheel’s center-point reference now that all of the necessary
shapes are in place, so you can delete the ruler guides.
Note that this menu also includes options for showing or hiding guides, locking guides,
and numerically editing the position of a guide. These options are all useful at some
point, depending on the purpose of a particular guide.
13. Choose View>Rulers to toggle off the rulers.
14. Save the file and continue to the next exercise.
Project 1: Corvette Artwork 53