
Page 12 - CC2017_AN_Look_Inside
P. 12
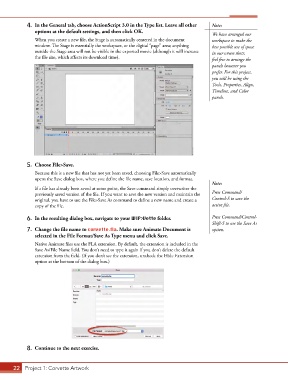
4.  In the General tab, choose ActionScript 3.0 in the Type list. Leave all other   Note:
               options at the default settings, and then click OK.
                                                                                        We have arranged our
               When you create a new file, the Stage is automatically centered in the document   workspace to make the
               window. The Stage is essentially the workspace, or the digital “page” area; anything   best possible use of space
               outside the Stage area will not be visible in the exported movie (although it will increase   in our screen shots;
               the file size, which affects its download time).                         feel free to arrange the
                                                                                        panels however you
                                                                                        prefer. For this project,
                                                                                        you will be using the
                                                                                        Tools, Properties, Align,
                                                                                        Timeline, and Color
                                                                                        panels.


            5.  Choose File>Save.
               Because this is a new file that has not yet been saved, choosing File>Save automatically
               opens the Save dialog box, where you define the file name, save location, and format.
                                                                                        Note:
               If a file has already been saved at some point, the Save command simply overwrites the
               previously saved version of the file. If you want to save the new version and maintain the   Press Command/
               original, you have to use the File>Save As command to define a new name and create a   Control-S to save the
               copy of the file.                                                        active file.

            6.  In the resulting dialog box, navigate to your WIP>Vette folder.         Press Command/Control-
                                                                                        Shift-S to use the Save As
            7.  Change the file name to corvette.fla. Make sure Animate Document is     option.
               selected in the File Format/Save As Type menu and click Save.
               Native Animate files use the FLA extension. By default, the extension is included in the
               Save As/File Name field. You don’t need to type it again if you don’t delete the default
               extension from the field. (If you don’t see the extension, uncheck the Hide Extension
               option at the bottom of the dialog box.)


            8.  Continue to the next exercise.


       22 Project 1: Corvette Artwork